User Tools
Table of Contents
Hydrophones
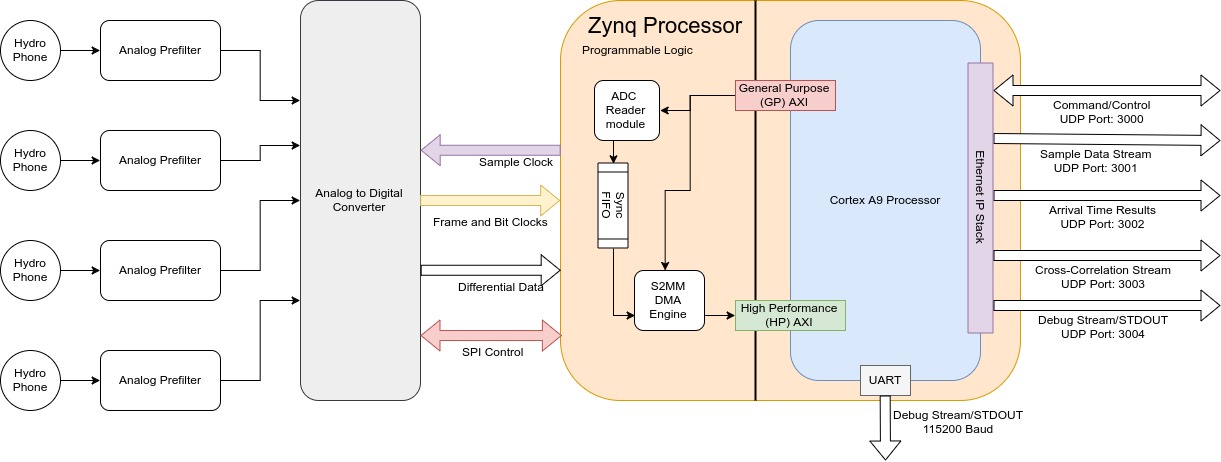
We use our hydrophones to locate the pinger in the pool, which can be utilized for localization purposes.
Introduction
Note: The purpose of this page is to describe how the arrival times are acquired on a number of hydrophone channels. Documentation describing how that information is turned into a pinger bearing is found here.
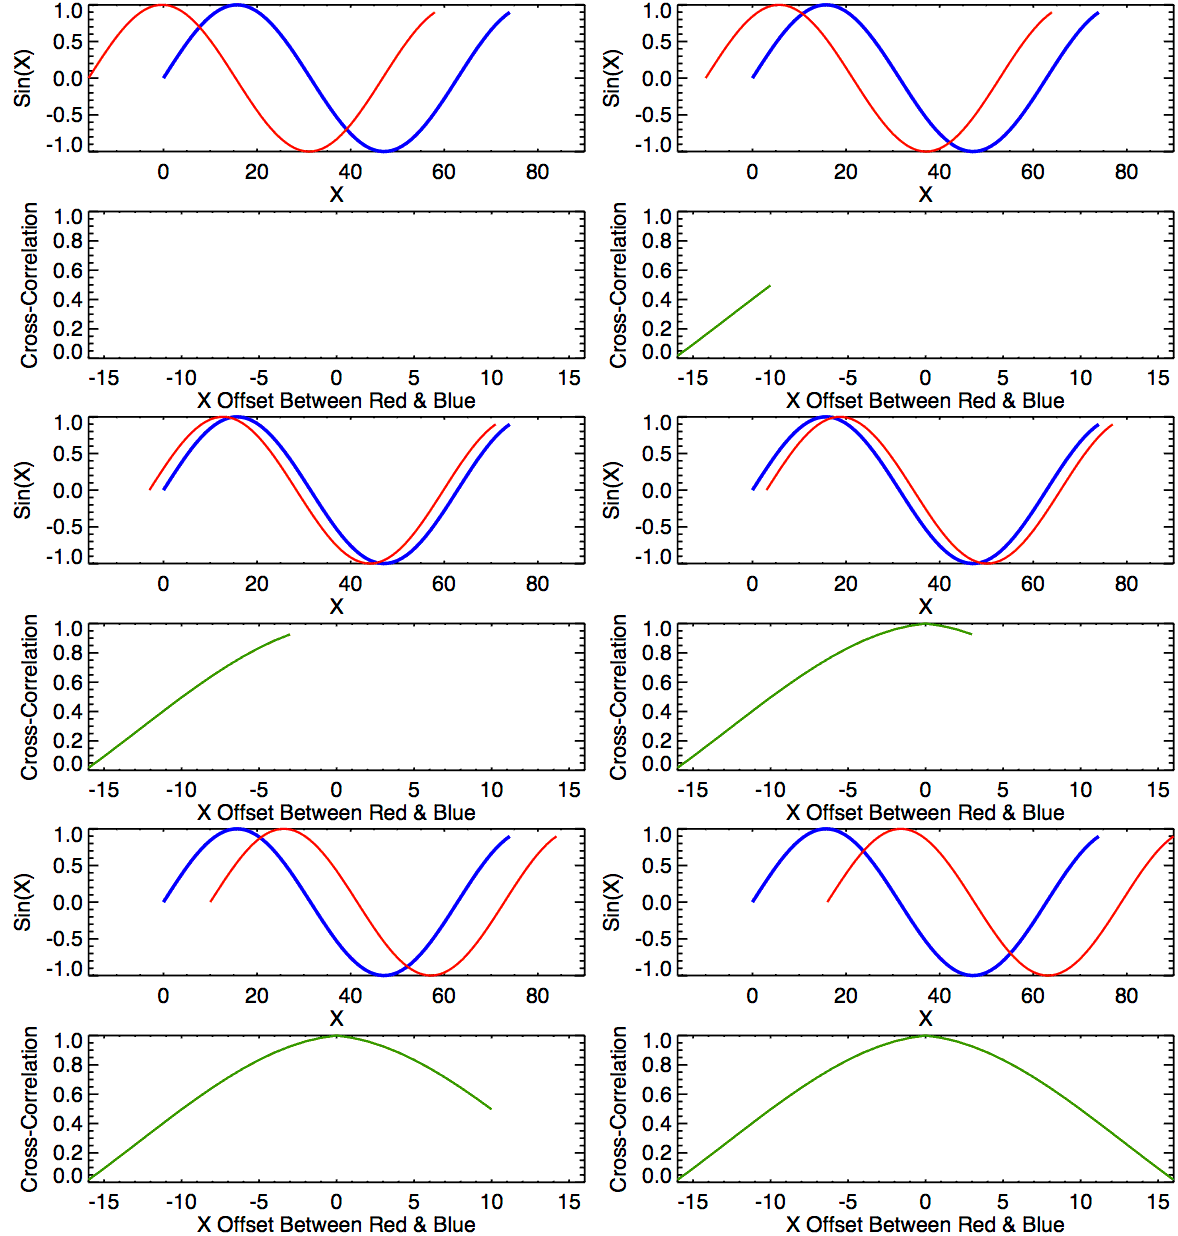
The arrival time calculations tend to be complicated by noise, which means that it is not possible to trivially detect rising edges. The ping can be thought of as an identical signal arriving at slightly different times on each of the hydrophones. In order to accurately calculate the time differences between each signal, a cross correlation is used. A cross correlation essentially slides one signal over the top of another, and at the point where the signals maximally overlap, the amount of shifting needed is equal to the time delay of the signal. Below is an example of a cross correlation with a sine wave. In the demo, you can see that at X offset = 0, the correlation result is maximum. Therefore, the time delay of the two signals is zero (as they are duplicates of eachother).
Further simplifications can be applied to the problem as well. By ensuring that the hydrophones are close enough, it can be guaranteed that the arrival time difference will never exceed one half wavelength (the signals are sinusoidal with a maximum frequency of 40KHz). The cross correlation now only needs to be completed within +/- half a wavelength (which increases accuracy and decreases required processing). This means that the arrival time difference can never exceed approximately 12.5 microseconds. Because the speed of sound in water is 1498 m/s, the hydrophones must be spaced within 1.8cm of each other.
To calculate a cross correlation, set time delays of [-12.5, 12.5] microseconds on the signal and calculate the overlapping area for each time delay. Calculating overlap is done by multiplying the value of the origin hydrophone at a time step by the value of the shifted hydrophone function at the same time step and summing up all multiplied values. When both are positive or negative, a point constructively adds to the correlation. When the signs don't match on the points, the correlation decreases. When both signals are identical, the correlation is maximal.
Summary
Now that the theoretical aspects are out of the way, the foundation of the problem starts to take shape.
- Acquire signals on all four hydrophones (one reference and 3 along each X, Y, and Z axis)
- Cross-correlate the X, Y, and Z axis signals against the reference to calculate time of flight delay.
The main difficulty exists in sampling the signals. It is important that samples are taken simultaneously on each of the hydrophones and that the signals are sampled fast enough to ensure that the precision is accurate enough (for example, at a sampling frequency of 1MHz, the time of arrival can never be more precise than a single microsecond). Therefore, the system must be capable of simultaneously sampling four channels at a minimum rate of 1MHz.
System Design
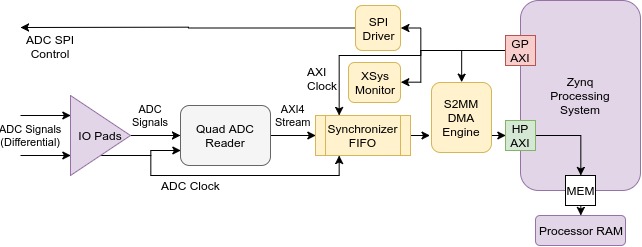
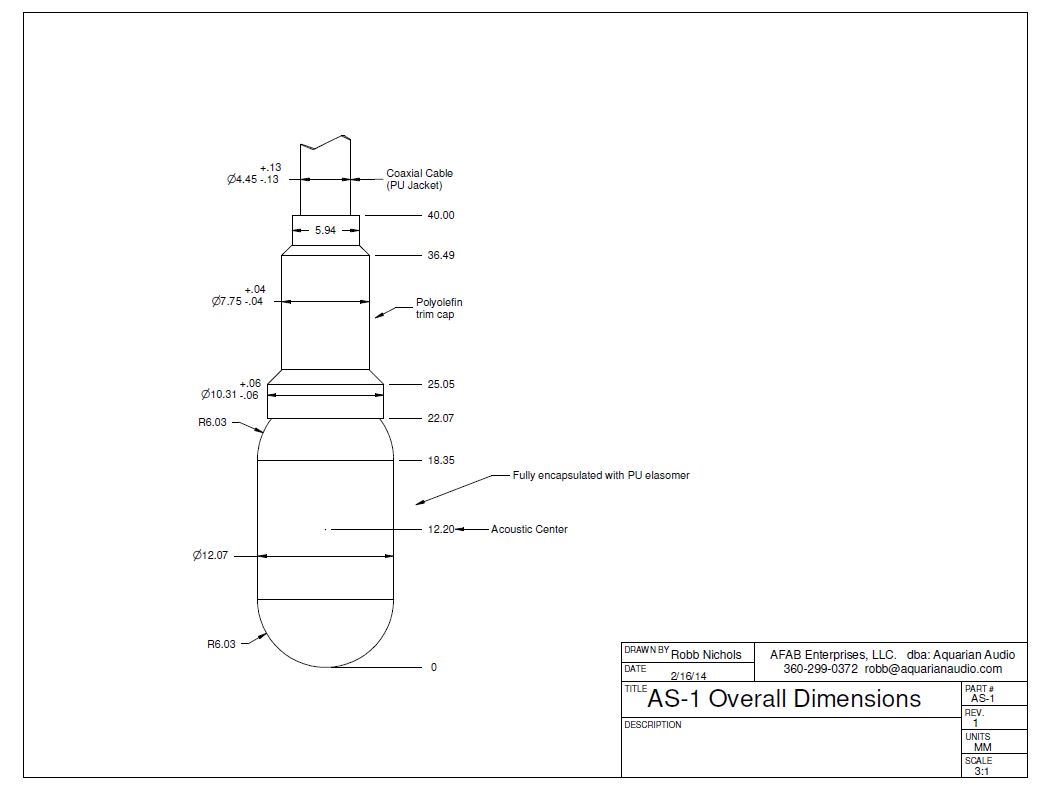
The hydrophones have a piezo sensors that outputs small voltages as sound hits them. To be able to read them, the hydrophone signals are filtered with a 1st order bandpass and then are gained by approximately 40-60dB. After the signals are amplified, they are then passed to the ADC for conversion. The ADC samples the hydrophone signals at 5MHz simultaneously and outputs the converted information over a custom, parallel interface. This interface is differential and utilizes DDR (Dual data rate). In order to read the ADC values, the Zynq SoC is used. The Zynq has a dual core ARM processor embedded in FPGA fabric. A custom Verilog module was created for reading the parallel interface output by the ADC. The data is then sent over the AXI4-Stream protocol to allow it to be transferred into the processor's RAM through the HP-AXI interface (AXI is a common communication protocol for custom hardware modules written in Verilog). In order to accommodate the high data rate of the analog measurements, the AXI stream is connected to a DMA engine. The DMA puts the data into the CPU RAM and tells the processor about it. At this point, the data has been successfully transferred into the computer and the cross correlation can be performed. The below sections delve into specifics of each of the different design areas.
Analog Design
The analog signal goes through a five-stage amplification and filtering process. First, the signal is sent through two gain stages, each of which apply an adjustable gain to the signal. After the signal is gained into a reasonable voltage range, it is passed through a low-pass filter and then a high-pass filter to result in a bandpass filter of the signal.
Once the signal has been filtered and gained, it is preprocessed for the ADC. In order to acquire more accurate measurements, the ADC requires signals to be differential. The analog signals are therefore put through a single-ended to differential converter and biased around a DC voltage supplied by the ADC. Immediately before the signals enter the ADC, there is a low-pass anti-aliasing filtering (Low-pass differential RC).
FPGA Design
The FPGA has a number of parts to it, but its ultimate goal is to take samples sent from the ADC and transfer them into the processor's memory. Immediately, the differential signals are passed to the FPGA IO buffers to convert them to single-ended. After the single-ended conversion, a custom Verilog block was written that takes in the ADC's clock and data signals to properly digitize the data. It then provides this data on an AXI-Stream interface. Because ADC reader block is driven off an external clock and the rest of the FPGA is clocked internally, care must be taken to cross the clock boundaries to prevent metastability. The Xilinx FIFO generator was used, as it generates an asynchronous read-write FIFO that can be used for synchronizing data with the internal FPGA clock.
After synchronization, the AXI stream is connected to a Stream-To-Multi-Master Direct Memory Access (S2MM DMA) engine. The DMA engine is a software-programmable peripheral that will asynchronously write the ADC samples into the processor's RAM.
There are a few other features implemented in the FPGA fabric, including the XSystemMonitor, which monitors the FPGA temperature, and a SPI module implemented that is used to program the ADC internal registers and verify its functionality. In Rev C of the HydroZynq, the manually adjustable potentiometers have been replaced with SPI-programmable potentiometers, which allows the analog gain of the signal to be controlled digitally.
Software Design
Note: For simplicity, the HydroZynq is programmed bare-metal. There is no operating system on the board!
The software design is straightforward, but the most complex of the other systems. Communication with other computers is implemented using UDP sockets provided by the lwIP (lightweight IP) library. When the CPU first boots, it loads the program off the SD card into memory. It then programs the FPGA bit stream and begins program execution after initializing most of the hardware peripherals, such as the Xilinx Gigabit-Ethernet peripheral. The application is then responsible for initializing soft peripherals that were instantiated in the FPGA fabric (such as the ADC reader, the system monitor, and the SPI engine). It configures the ADC chip and binds/connects to a variety of UDP ports for communication.
The software first attempts to sync onto the ping. Because the ping happens every two seconds, once the first ping has been found, the system can consistently find every other ping afterwards. To acquire initial synchronization, the code samples the hydrophones for 2.1 seconds and scans the data for the earliest start of a ping (by performing a threshold detection). Then, it calculates at what exact time the ping started and schedules sampling to begin at the next ping.
After sync is acquired, the software samples for approximately 250ms during the ping period. It then verifies that the ping is present and truncates around the start of the ping to minimize the amount of data that needs to be cross-correlated. The software marks the timestamp of the ping and schedules a time that the next ping should occur at. Finally, the data is then cross-correlated to calculate the time of arrival delays for each ping. The software then transmits a variety of debug information (including all sample data, correlation calculations, and time of arrival deltas) over ethernet. The cycle continuously repeats until a ping is not detected in the 250ms sample period. If this occurs, the application will try to regain sync by continuously sampling for 2.1 seconds.
Getting Started
This section is designed to help a developer get started updating and programming the HydroZynq.
Code
All software and firmware is available in the Gitlab repository. There are two primary directories, hardware/ and software/. The hardware/ folder contains all the Verilog and TCL files for interacting with Vivado. TCL scripts have been generated to rebuild the block design in Vivado, and a README.txt file in proj/ describes how to use them. Additionally, the IO constraints file is provided for the current hardware.
The software folder contains all C source code used in programming the HydroZynq. An ELF file can be created by using the mk script supplied with the source file name.
Example:
./mk app/main_bin.c
All files located in src/ will be compiled against the application specified to generate the binary.
Programming & Debugging
In order to generate a boot-able BOOT.bin file (binary image that is used for booting off the SD card), utilize the doit script in the software/ directory.
Example:
./doit app/main_bin.c bit/adc_dma_revb.bit
This will automatically mount and copy over BOOT.bin to an SD card for the HydroZynq. This script takes in the source file name of the main application as the first argument and the bit stream file as the second parameter.
The current firmware utilizes software/bit/adc_dma_revb.bit as the bitstream file.
In order to efficiently debug through GDB and program on the fly, the Digilent HS3 can be used as a JTAG access point for GDB debug interfaces. To interact with the HydroZynq through JTAG, use the xmd command (provided by the Xilinx Vivado tool suite).
After executing xmd from the command line, you will enter a shell-like environment. To connect to the ARM core for programming, enter:
> connect arm hw
Once connected, if you desired to program the FPGA or the ARM, stop the ARM CPU:
> stop
To program a new bitstream:
> fpga -f [bitstream_file_path]
To load a new ELF onto the CPU:
> dow [elf_file_path]
Finally, the CPU can be restarted:
> run
Once XMD has been started, a remote GDB server is automatically instantiated. To connect to the GDB server, use the software/debug.sh script to launch up a GDB session.
[hydrozynq-repo-path]/software/debug.sh
Communication
The HydroZynq communicates through UDP. A number of user scripts have been created in the scripts/ folder for ease of use with UDP. For example, the stdout of the application is sent to Cobalt's UDP port 3004 (e.g. 192.168.0.2:3004). A simple python application ([hydrozynq-repo-path]/scripts.debug_stream.py) can be used to view the standard output of the application (such as dbprintf() statements).
Port Descriptions
| Port Number | Destination | Description |
|---|---|---|
| 3000 | HydroZynq | Command port |
| 3001 | Cobalt | Sample data stream port |
| 3002 | Cobalt | Time of Arrival Delay result port |
| 3003 | Cobalt | Cross-correlation stream port |
| 3004 | Cobalt | Debug/STDOUT port |
| 3005 | Cobalt | Requests to silence the control system. |
Note that the HydroZynq does not run ROS natively, so python scripts running on cobalt are necessary for interfacing the HydroZynq with ROS. As of now, these scripts are still under development.
The HydroZynq currently sends out all samples used in the cross correlation and the results of the final cross-correlation. These can be visualized using python and MatPlotLib through the scripts made available here:
python [hydrozynq-repo-path]/scripts/data_receiver.py
python [hydrozynq-repo-path]/scripts/correlation_receiver.py
The data and correlation results are sent using a trivial packet format:

All data is little-endian integers. Bit sizes are shown in parentheses. Data packets send the raw ADC reading for each point and correlation packets send the correlation function values for each time shift calculated.
The HydroZynq also allows for run-time parameters to be set dynamically, including the ping detection threshold. These can be sent to the HydroZynq command port in a simple ASCII string.
[keyword]:[value],[keyword]:[value],.... (etc)
Examples:
threshold:500,debug:1
reset:1
frequency 35000
The supported keys are as follows:
| Key String | Data Type | Description |
|---|---|---|
| reset | N/A | Causes the Zynq to perform a software reset. |
| threshold | unsigned int | Sets the HydroZynq ping ADC threshold value. |
| debug | unsigned int | If data is 0, HydroZynq debug mode is disabled. Otherwise, debug mode is enabled. |
| frequency | unsigned int | Specifies target pinger frequency. May be 25000, 30000, 35000, or 40000. Units are Hz. This must be set or the zynq will not look for pings. |
| post_ping_duration_us | unsigned int | The number of microseconds after ping threshold to truncate the signal to. Default: 50 us |
| pre_ping_duration_us | unsigned int | The number of microseconds before ping threshold to truncate the signal to. Default: 100 us |
| filter | unsigned int | If data is 0, IIR filtering is disabled. Otherwise, filter is enabled. Default: disabled. |
| min_fft_samples | unsigned int | The minimum number of samples to be used in Fourier transforms. In situations where fewer than this number of samples are available (e.g. ping detected close to end of sample set such that only a small number of samples are left before the end of the data array), a fourier transform will not be performed and the zynq will have to resync with the ping. Performing Fourier transforms on small numbers of samples will likely cause inaccurate frequencies to be reported. Default: 2048 |
| N/A | Prints out all current zynq parameter values. |
In debug mode, the HydroZynq records for 2.1 seconds, dumps all 2.1 seconds of data to the data stream port, and repeats. No correlations are performed and no result is sent.


